

15 Budget-Smart Home Improvements That Add $10k+ Value in 2025

Want to boost your home's value without draining your savings? You're not alone. A 2023 survey revealed that 2 in 5 homeowners blew past their home improvement budget, showing why smart planning is essential now more than ever. If you're wondering what adds value to a house, these best home improvements offer an excellent return on investment (ROI) and boost resale potential.
The numbers tell an interesting story. Nine of the top 10 highest-ROI improvement projects focus on exterior upgrades, according to Zonda's research. Take garage door replacement—at $4,513, it delivers a stunning 194 percent cost recovery. Similarly, a new steel front door costs just $2,355 but returns 188 percent on investment. Even a minor kitchen remodel can add approximately $26,000 to your home's value with a 96 percent ROI resale value.
What makes certain house upgrades worth the investment? The best ROI home improvements enhance curb appeal, boost energy efficiency, and create more functional spaces. Freddie Mac reports that energy-efficient homes command 3% to 5% higher prices than their less efficient counterparts. Simple DIY projects like upgrading kitchen cabinets or adding bathroom vent fans offer cost-effective ways to increase value while preventing costly problems later.
This guide walks you through 15 affordable home upgrades that maximize returns without breaking the bank. From weekend warrior projects to strategic upgrades like basement finishing or creating an open floor plan, these improvements deliver serious value in the Canadian real estate market.
Paint Your Walls for a Fresh Look

Image Source: NerdWallet
Painting tops the list of home improvement projects with exceptional return on investment. A simple coat of paint transforms a room completely without the hefty price tag of major renovations. The right color choice can significantly impact your home's value, potentially adding thousands of dollars when it's time to sell.
Paint Your Walls Cost in Canada
The cost of interior painting in Canada depends on several factors including room dimensions and paint quality. A standard 10×14 foot room typically costs CAD 390.14 – CAD 780.28 including labor and materials. Taking the DIY route slashes this expense dramatically, with material costs averaging around CAD 139.34 per room. Quality matters when selecting paint—high-grade options range from CAD 48.77 per gallon for flat finish to CAD 69.67 for high-gloss varieties. While premium paint requires larger upfront investment, budget options under CAD 34.83 per gallon often prove more expensive long-term as they need multiple coats and deteriorate quickly.
Best Colors to Boost Home Value
Zillow's research reveals that strategic color choices can boost a buyer's offer by up to CAD 6966.80. Light-blue bathrooms stand out as particularly valuable, potentially increasing home value by 1.6%. Dark blue bedrooms add approximately CAD 2090.04 to a property's value. The once-popular all-white approach has fallen from grace—white kitchens may actually reduce offers by more than CAD 836.02. Today's buyers prefer neutral colors like "greige" (gray-beige blends) and warm gray tones, which help properties sell faster and often for higher prices.
DIY Tips for Painting Success
Professional-quality results start with thorough preparation. Clean walls meticulously before painting and apply primer, especially when transitioning from dark to light colors. To avoid visible lap marks, maintain a "wet edge" by overlapping each roller stroke before the previous one dries. For perfectly smooth trim without brush marks, sand between each coat. Another pro tip: "box" your paint by mixing all cans together in a 5-gallon bucket to ensure consistent color throughout the space.
Painting delivers remarkable value enhancement with minimal investment, making it one of the most accessible yet powerful home improvements for boosting property value.
Upgrade Your Front Door for Instant Curb Appeal

Image Source: I.C. Designs
Front doors pack a powerful punch when it comes to return on investment. Most real estate agents confirm what savvy homeowners already know - buyer first impressions start right at the front door. More impressive still, one study revealed that homes featuring brand-name doors gained perceived value up to five times the actual cost of the door itself.
Front Door Replacement Costs in Canada
Front door costs fluctuate dramatically based on materials and design choices. Across Canada, expect to pay between CAD 2,090.04 for basic options and upwards of CAD 6,966.80 for high-end exterior doors. Your material selection significantly impacts the final price:
PVC doors: CAD 1,811.37-2,508.05 (good thermal insulation)
Steel doors: CAD 2,368.71-2,647.38 (durable, low maintenance)
Fiberglass doors: CAD 2,508.05-3,204.73 (minimal maintenance)
Wood doors: CAD 2,647.38-3,344.06 (esthetically pleasing)
Aluminum doors: CAD 3,344.06-5,852.11 (lightweight, innovative designs)
Regional differences play a role too - Ontario homeowners pay an average of CAD 5,434.10 for a pre-hung, painted single fiberglass door with one sidelight.
Best Front Door Styles for 2025
The 2025 front door scene balances beautiful design with practical functionality. Oversized doors are stealing the spotlight, creating dramatic entrances that completely transform home exteriors. Bold colors are pushing neutrals aside as homeowners embrace self-expression. That said, matte black hasn't lost its appeal - it remains a timeless choice that exudes sophistication while complementing various architectural styles.
Clean lines and minimalist features dominate contemporary door designs. Doors featuring glass elements are particularly popular, bringing openness and modern flair to entryways. For a more welcoming vibe, warm browns, soft greens, and deep blues top the charts.
DIY vs Professional Installation
The DIY route saves on labor costs but demands careful planning. Installing your own door requires proper tools, exact measurements, and technical know-how. Professional installation, while pricier, guarantees precision and proper fitting.
Going DIY comes with risks - improper installation can lead to energy loss, security vulnerabilities, and diminished curb appeal. Professionals typically complete the job in 5-6 hours, and though they add CAD 278.67 to CAD 836.02 in labor costs, many offer workmanship warranties that provide valuable peace of mind.
Install a Programmable Thermostat

Image Source: Airtek
Want to make a smart investment that pays you back month after month? A programmable thermostat stands out as one of the most cost-effective energy-efficient upgrades you can make. Homeowners typically save up to 10% annually on heating and cooling costs just by scheduling temperature adjustments for times when they're sleeping or away. This energy-efficient upgrade not only saves money but also adds value to your home.
Programmable Thermostat Benefits
The beauty of programmable thermostats lies in their set-it-and-forget-it convenience. These devices store multiple daily settings that automatically adjust your home's temperature based on your schedule. No more forgetting to turn down the heat when you leave for work or waking up to a chilly house.
What really sets these devices apart is their precision. While old-school manual thermostats can swing temperatures by five degrees in either direction, programmable models maintain accuracy within just half a degree. This precision eliminates those annoying hot and cold spots throughout your home, creating consistently comfortable living spaces.
Top Smart Thermostats in Canada

Canadian homes often use electric baseboard heating systems, making the Mysa Smart Thermostat an excellent choice with its 120-240V compatibility and impressive energy savings. Most smart thermostats now offer Wi-Fi connectivity and smartphone control, taking functionality well beyond basic programmable models.
Installation Tips for Beginners
Before heading to the store, check your existing HVAC system compatibility with your desired thermostat model. Safety comes first—always disconnect power at the circuit breaker before touching any wiring.
A quick tip that saves headaches: take a photo or label each wire before disconnecting anything. Older homes sometimes lack a C-wire (common wire), so consider models like Nest that work without one, or pick up a C-wire adapter if needed.
Once installed, program your thermostat for maximum savings—experts recommend setting temperatures 7-10 degrees lower during 8-hour periods when you're sleeping or away from home. These small adjustments add up to significant savings while maintaining comfort when you need it most.
Refinish or Reveal Hardwood Floors
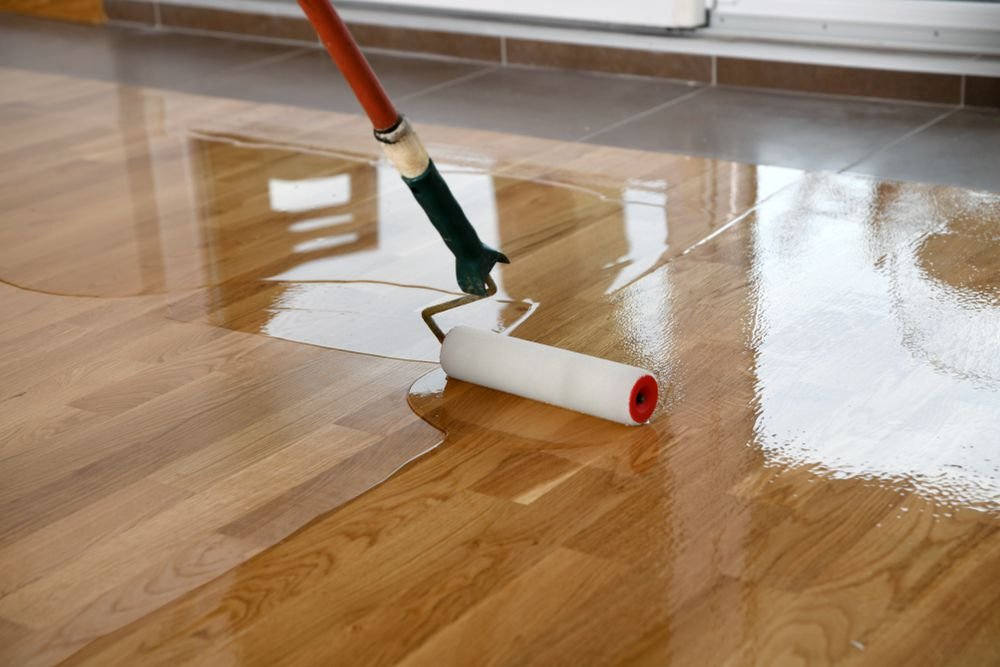
Image Source: LV Hardwood Flooring
Hidden beneath that old carpeting might be your home's secret weapon - original hardwood flooring. Did you know refinishing existing hardwood floors delivers a stunning 147% return on investment? This makes it one of the smartest home improvements you can tackle. Simply revealing and refreshing wooden floors can completely transform how buyers see your property. When considering the best home flooring options, hardwood consistently ranks high for both aesthetics and value.
Hardwood Floor Refinishing Costs
What should you budget for hardwood floor refinishing in Canada? Professional services typically run between CAD 4.18 and CAD 11.15 per square foot. For a complete project, expect to pay around CAD 2623.70 on average, though costs can range from CAD 1534.09 to CAD 3714.70 depending on floor condition and room dimensions. Smaller rooms often cost more per square foot because equipment becomes harder to maneuver in tight spaces.
DIY refinishing materials generally total between CAD 696.68 and CAD 1393.36. This breaks down to sandpaper (CAD 41.80-69.67), wood stain (CAD 27.87-55.73), polyurethane finish (CAD 55.73-139.34), and equipment rental (CAD 83.60-167.20 per day).
Signs You Should Refinish
How do you know when it's time to refinish? Look for these telltale indicators:
Water droplets soak into the wood rather than beading on the surface
Scratches and gouges that remain visible despite cleaning
Stained or discolored areas from water damage or sun exposure
Persistent dullness even after thorough cleaning
Floor feels sticky to the touch after cleaning
Beyond these visible signs, hardwood floors typically need refinishing every 7-10 years in high-traffic areas and every 10-15 years in less-used spaces.
DIY vs Hiring a Pro
The choice between DIY refinishing and hiring professionals comes down to several important factors. Professional refinishers work much more efficiently - typically completing about 1,000 square feet per day, while homeowners might take 2-4 times longer. Pros also use commercial-grade equipment that collects more dust and creates more consistent results.
DIY refinishing might seem cheaper at first glance but often results in uneven sanding that creates permanent dips and divots. Most first-time DIYers apply improper pressure or sand too deeply, potentially cutting years off their floor's lifespan. Professional work typically lasts 7-10 years, while DIY projects often need redoing within just 2-4 years.
When considering which flooring is best for your home, remember that hardwood floors consistently rank among the top choices for both beauty and resale value. Whether you choose hardwood flooring, engineered hardwood, or even luxury vinyl plank, proper maintenance and timely refinishing can significantly extend the life of your floors. If you're wondering how much value does new flooring add to a home, quality hardwood can increase your home's value by 2.5% or more.
Add a Kitchen Backsplash on a Budget
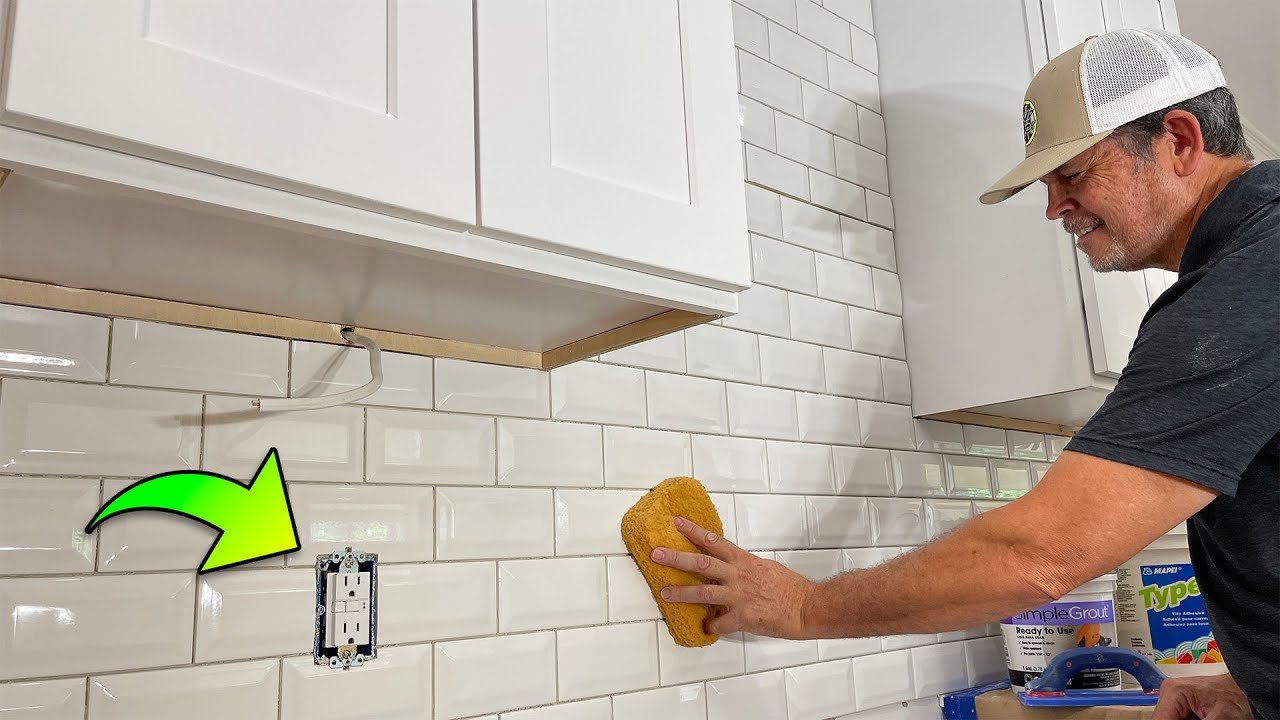
Image Source: YouTube
Kitchen backsplashes pull double duty – they protect your walls while adding serious style points to your space. This small-scale project can completely refresh your kitchen's look without the hefty price tag of a full kitchen remodel. Most Canadian homeowners spend between CAD 836.02 and CAD 1811.37 for a professionally installed backsplash. When considering the best kitchen flooring 2023 options, remember that your backsplash should complement your flooring choice for a cohesive look.
Affordable Backsplash Materials
Want bang for your buck? Check out these wallet-friendly options:
Ceramic and porcelain tiles start at just CAD 2.79 per square foot, making them budget champions
Peel-and-stick tiles skip the messy grout step – perfect if you're new to DIY projects
Glass tiles create eye-catching shimmer with small-area projects possible under CAD 209.00 total
Thermoplastic panels rank among the most affordable options alongside ceramic
Working with an ultra-tight budget? Get creative with painted beadboard, moisture-protected vinyl wallpaper, or even repurposed wood for that rustic charm.
DIY Backsplash Installation Guide
Ready to tackle this yourself? Follow these steps to slash labor costs:
Take precise measurements to calculate exactly how much material you'll need
Clean walls thoroughly and move appliances to create a clear workspace
Apply your adhesive – choose between traditional mortar or beginner-friendly peel-and-stick mats
Set tiles with spacers for even gaps, always working bottom to top
Give adhesive proper time to dry before moving on to grouting
Finish by caulking between the backsplash and countertop for a clean look
First DIY project? Peel-and-stick options or pre-mixed grout eliminate several tricky steps and reduce potential mistakes.
Best Styles for 2025
Kitchen design is constantly evolving, with these backsplash trends taking center stage in 2025:
Fluted backsplashes that create subtle texture and visual interest
Large-format tiles that minimize grout lines for a sleek, expansive look
Rich earth tones – think terracotta, forest green, and deep burgundy
Metal backsplashes bringing industrial-luxe vibes, especially behind ranges
High-end porcelain that mimics expensive stone with remarkable accuracy
Don't forget that installation pattern can transform even basic tiles. Chevron arrangements, creative layouts, or mixing tile shapes in matching finishes can create that custom, designer look without the premium price.
Replace Outdated Light Fixtures

Image Source: Rowabi lighting
Outdated light fixtures can make your home appear stuck in another decade. Swapping them out ranks among the quickest ways to modernize any space. Did you know some buyers won't even consider a home with poor lighting, regardless of how well it meets their other needs? Updating fixtures is a key part of how to increase home value.
Lighting Trends That Add Value
Replacing those dated fluorescent box lights with modern alternatives creates an immediate visual impact in any room. Buyers love seeing recessed architectural lighting already installed, as they appreciate not having to tackle this invasive work themselves. Kitchen spaces benefit hugely from under-cabinet and in-drawer lighting, while bathrooms shine with color-temperature adjustable vanity lights.
Don't forget your outdoor spaces. Path lighting and subtle landscape accent lighting not only look fantastic but improve safety after dark. And those old ceiling fans with pull chains? Swap them for contemporary designs with remote controls that improve both air circulation and room appearance.
Cost of Upgrading Lighting in Canada
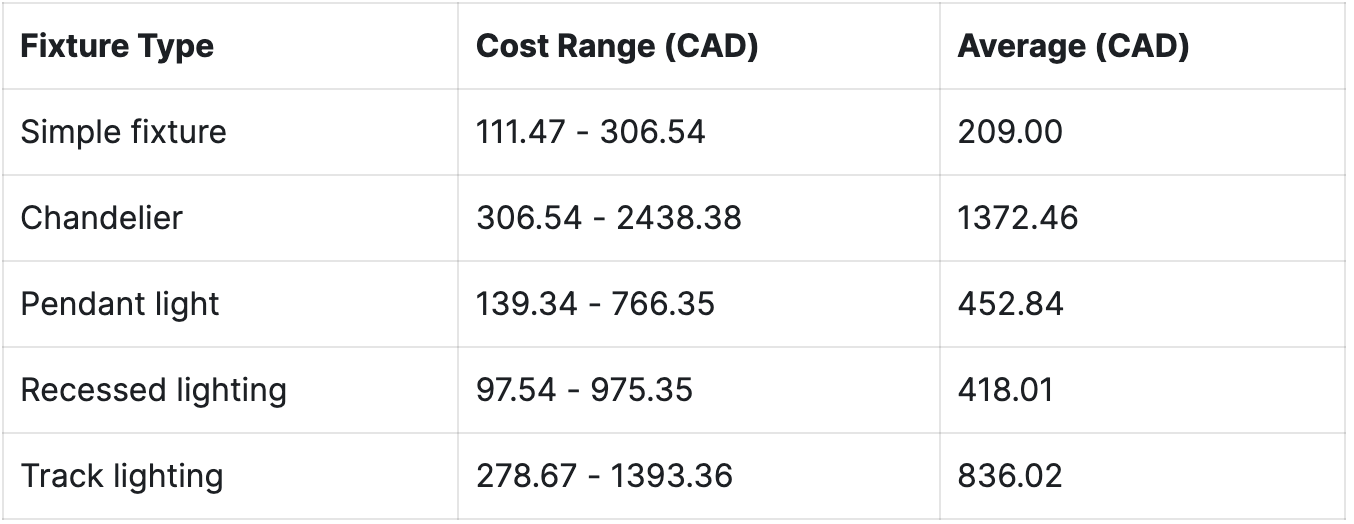
Professional installation adds CAD 69.67 to CAD 278.67 per hour. Going the DIY route? Basic fixtures can cost as little as CAD 139.34 in materials.
DIY Light Fixture Installation Tips
Before grabbing your toolbox, follow these essential safety steps:
Turn off power at the electrical panel and double-check with a voltage tester
Check your junction box's weight capacity (usually supports up to 50 pounds)
Snap photos of existing wiring connections before disconnecting anything
Match wires properly—black to black (hot), white to white (neutral), copper/silver to ground
Carefully tuck all wires into the junction box before securing your new fixture
First time installing a light? Grab a friend to hold the fixture while you handle the wiring. Having all your materials prepped and within arm's reach makes the whole process go much smoother.
Modern light fixtures offer that perfect blend of function and beauty—giving you excellent value through a relatively small investment. Consider incorporating smart home features like voice-controlled lighting for added appeal to tech-savvy buyers.
Boost Storage with Modular Shelving

Image Source: Decoist
Clutter-free spaces make homes more appealing to potential buyers. Modular shelving systems represent a practical renovation that enhances both functionality and esthetics, maximizing even awkward corners that would otherwise remain unused. In fact, properly installed storage solutions can significantly influence a prospective buyer's impression of a property.
Best Modular Shelving Systems
Look for flexibility in your shelving choices. Systems with adjustable components allow customization for various items, from bulky equipment to delicate decorative pieces. Ikea offers numerous styles that fit every space and taste, with different materials, colors, and finishes to match your home decor. For those seeking durability, metal wall shelving systems typically feature protective-coated steel wire frames that support wood or other material shelves. Shelves can be adjusted up or down to accommodate whatever needs storing.
DIY Modular Shelving Ideas
Creating custom modular storage doesn't have to be complicated. One approach uses wooden crates and paint to craft trendy, affordable solutions. To increase modularity, secure crates together using clips or clamps, allowing configuration changes as needed. Another option involves mounting vertical wood strips to walls as supports for adjustable shelves. Before installation, use masking tape to mark desired measurements, ensuring proper alignment.
Cost-Effective Storage Solutions
Beyond esthetic appeal, modular shelving offers exceptional value. Unlike built-ins that remain fixed, modular systems can be reconfigured or relocated as needs change. Homeowners can start small and gradually expand their storage as budgets allow. Affordable organizing solutions include baskets, boxes, and bins that transform ordinary shelves into efficient storage centers.
Modular shelving makes spaces appear larger by eliminating bulky furniture pieces. This improvement is worth considering, since potential buyers often cite lack of storage as a common concern during home viewings. Well-designed storage enhances visual appeal – transforming chaotic spaces into organized showcases that buyers can envision themselves living in. This is especially valuable when creating a functional home office space, which has become increasingly important to many buyers.
Update Bathroom Fixtures for a Modern Look
Bathroom fixtures tend to show their age faster than other home elements, yet swapping them out delivers exceptional value for minimal cost. Even the most dated sink gets an instant facelift with new fixtures, creating that "completely renovated" impression without the hefty renovation price tag. Buyers consistently notice these small updates, making fixture replacement one of the smartest budget-friendly improvements you can make.
Top Bathroom Fixture Trends
Bathroom fixtures in 2025 are evolving from purely functional elements into true design statements. The eco-conscious movement has pushed sustainable materials and water-saving fixtures like low-flow toilets and efficient showerheads into the spotlight—helping you conserve water while trimming those monthly utility bills.
Looking to warm up your bathroom's appearance? Champagne bronze, polished nickel, and brushed gold finishes are dominating the trend landscape, bringing rich, inviting tones to previously sterile spaces. Graphite black has emerged as a sophisticated alternative to the ubiquitous matte black of recent years. These updated fixtures function as bathroom "jewelry"—those perfect little accents that elevate the entire space.
DIY Bathroom Fixture Replacement
Ready to tackle this project yourself? Replacing a bathroom faucet typically takes under an hour when you have the right tools. Here's how to get started:
Turn off water supply at the valves beneath the sink
Disconnect supply lines and remove the old faucet
Clean the surface around faucet holes thoroughly
Apply plumber's putty or silicone caulk if needed
Install your new faucet following manufacturer's instructions
Reconnect supply lines and check for leaks
First-time DIYers should stick with single-hole faucets for simpler installation. When selecting fixtures, opt for faucets with ceramic disk valves rather than cheaper alternatives—they'll last significantly longer and perform better over time.

Professional installation adds about CAD 69.67 to CAD 104.50 per hour to your budget, though DIY installation eliminates this expense entirely. If you're renovating to sell, consider installing mid-range fixtures that appeal to the broadest range of potential buyers—they can always upgrade to premium options later based on personal preference.
Remember, a bathroom upgrade doesn't always require a full remodel. Sometimes, simply updating fixtures, adding a fresh coat of paint, and improving lighting can dramatically transform the space and increase your home's value.
Create a Small Appliance Hideaway
Kitchen clutter quickly kills appeal, and small appliances rank as the worst offenders. Looking to reclaim your countertops? An appliance garage—a dedicated space for frequently used items—solves this common kitchen problem without sacrificing convenience.
Benefits of Appliance Garages
The magic of appliance garages lies in their ability to maintain clean, uncluttered countertops while keeping essential items easily accessible. Your toaster, food processor, and coffee maker remain ready for use yet hidden from view when not needed. This setup creates a more functional kitchen where countertops stay free for what they're meant for—food preparation. Potential buyers consistently notice and appreciate this thoughtful organization feature.
These hideaways do more than just look good. Modern designs often include built-in outlets for each appliance and interior lighting, eliminating the hassle of moving heavy items to power sources. No more digging to the back of deep cabinets for your blender or standing mixer—everything stays within easy reach but out of sight.
DIY Appliance Hideaway Ideas
Want to create an appliance garage without major renovation? Try these budget-friendly approaches:
Transform an existing deep corner cabinet by adjusting shelves to waist level for easier access
Add a countertop drawer unit with a pull-out shelf—appliances sit on top while utensils store below
Use magnetic cord ties to keep wires neat and prevent tangling when storing appliances
Another simple solution involves repositioning existing cabinet shelves to fit taller appliances, with labels for organization. For kitchens with minimal space, slim rolling cart organizers that tuck away when not in use work perfectly for appliance storage.
Cost to Install Appliance Storage
What should you budget for an appliance garage? Professional installation of a custom solution typically runs between CAD 291.21 and CAD 416.61. However, more complex projects requiring electrical work, plumbing updates, or cabinet modifications can reach upwards of CAD 2,786.72.
For multi-appliance solutions, package installations average CAD 362.27 to CAD 766.35. While DIY installations significantly cut costs, attempting complex electrical work without proper knowledge risks voiding warranties and potentially causing expensive damage.
Many homeowners find a middle ground by handling simpler preparations themselves—like disconnecting old appliances and clearing space—while bringing in professionals for the technical aspects of installation.
Power Wash Your Home's Exterior
Power washing stands out as one of the most dramatic transformations you can make to your home's exterior without breaking the bank. What potential buyers see first can either draw them in or turn them away - and nothing masks a home's true beauty like layers of dirt and grime. This simple weekend project doesn't just improve appearance; it can potentially add thousands to your property value.
Benefits of Power Washing
Think power washing is just about appearances? Think again. Regular cleaning protects your home's structural integrity by removing destructive substances that speed up deterioration. Mold, mildew, and algae aren't just eyesores - they actively damage siding, concrete, and wood surfaces when left unchecked. A freshly cleaned exterior can boost property value by up to 5% through improved curb appeal alone. This matters tremendously when you're selling, as potential buyers typically form impressions within seconds of seeing your property.
DIY Power Washing Tips
Ready to tackle this project yourself? Equipment choice makes all the difference. Electric pressure washers provide enough power (1300-1800 PSI) for most home cleaning tasks while remaining manageable for beginners. Gas-powered units pack more punch (2000-3000 PSI) for stubborn grime but require more maintenance and skill to operate.
Before you start spraying, follow these essential safety steps:
Wear protective gear including eye protection and closed-toe shoes
Cover electrical outlets and fixtures with waterproof materials
Start with the lowest pressure setting then gradually increase as needed
Keep a consistent distance of 18-24 inches from surfaces
Spray at a downward angle to prevent water from seeping behind siding
Cost of Hiring a Pro in Canada
Not comfortable handling the equipment yourself? Professional power washing services in Canada typically charge by square footage or hourly rates:
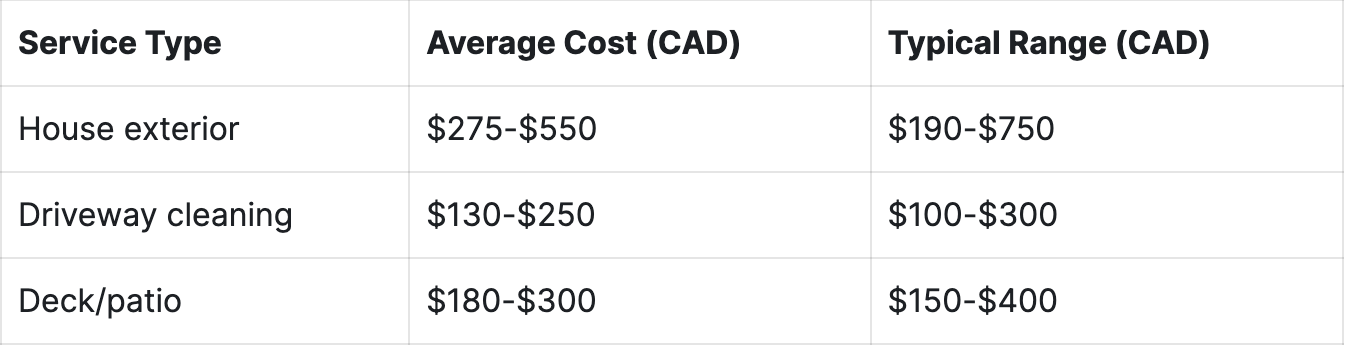
Few home improvements deliver such dramatic results for so little investment. Power washing transforms your home's appearance for a fraction of what other exterior renovations might cost, making it one of the smartest pre-sale improvements you can make. Consider combining this with a fresh coat of exterior paint or updating your landscaping for maximum curb appeal. For an extra boost, consider adding stone veneer to key exterior areas, which can provide a luxurious look and increase your home's value.
Install Energy-Efficient Windows
Energy-efficient windows stand out as one of the most valuable home improvements for long-term returns. Windows typically account for 25%-30% of residential heating and cooling energy use, making their upgrade a smart financial decision that extends far beyond just looks. This energy-efficient upgrade is a key part of how to increase home value.
Energy Savings from New Windows
Swapping old windows for ENERGY STAR certified models cuts household energy bills by up to 13% nationwide. This reduction translates to approximately CAD 98.93 to CAD 698.07 in annual utility savings. Your exact savings depend on where you live, with colder Canadian regions seeing the highest returns on this investment.
The benefits go beyond your wallet. Energy-efficient windows create noticeably more comfortable living spaces. During winter months, these windows maintain warmer interior glass surfaces, letting you actually use those window seats even when temperatures drop. Quality windows also come with coatings that block harmful UV rays, protecting your furniture and flooring from sun damage and fading.
Best Window Types for Canadian Homes

For homes facing Canada's diverse climate challenges, look for windows with U-factors below 1.2 W/m²·K for double-glazed and 0.8 W/m²·K for triple-glazed units. A Solar Heat Gain Coefficient (SHGC) between 0.3-0.4 typically works best for most Canadian homes.
Cost vs Value Analysis
Installing upscale vinyl replacement windows costs approximately CAD 13,933.60 but can boost your home value by CAD 9,335.51, giving you a 67% return on investment. Over their lifespan, quality windows eventually pay for themselves through energy savings, though this happens gradually over time.
The quality of installation matters tremendously—even the most efficient windows perform poorly when incorrectly installed. Professional installation through certified programs like Window Wise ensures you get maximum performance from your investment. If you're considering DIY installation, follow manufacturer instructions exactly, as improper installation can void warranties and compromise efficiency.
When considering energy-efficient upgrades, don't forget about HVAC replacement. An updated, energy-efficient HVAC system can significantly reduce your energy costs and increase your home's value, working in tandem with your new windows for optimal energy performance.
Build a Simple Outdoor Pathway
Want to transform your outdoor space instantly? A well-designed garden pathway does more than guide visitors—it prevents soil erosion in high-traffic areas while creating a stunning focal point that enhances your entire landscape. This addition can significantly boost your home's curb appeal and create inviting outdoor living spaces. Consider pairing this with a deck addition for maximum outdoor enjoyment and value.
DIY Stone Pathway Ideas
You've got several options to match your budget and skill level. Stepping stones represent the simplest approach, needing minimal digging while allowing creative placement patterns. For comfortable walking, space stones 20-24 inches apart from center to center. If you prefer a more formal look, paver pathways with running bond or herringbone patterns deliver structured elegance. Need something more natural? Irregularly shaped flagstones create that charming cottage garden feel without excessive labor.
Ready to build your own stone path?